
As of late I’ve been diligently working on a new file server system for my home network. The current file server I have utilizes an old Supermicro AOC-USASLP-L8i RAID card. This worked well to handle the many drives I have, however now It’s time to upgrade, and while I’m at it, expand the overall capabilities of the system. So I picked up a set of sub-$100 LSI 9640-8i RAID controllers from eBay. After a quick search I found a very nice write up from a guy going by the handle kkm on the Lime Technologies forums. The write up was great, however I did learn a few things which might help the next person out, so I’m going to repost it here with a few modifications and notes on what I experienced.
GOAL
Replace the current M1015 firmware with an IT (HBA pass through) so as to utilize the controller as a JBOD driver.
STEP 1 Generate your boot disk
Create a bootable FreeDOS USB flash drive. This can be done easily with the Unetbootin utility.
STEP 2 Grab the files you need
Download the m1015 IT flash utilities from here or from the original location on Mediafire. Once downloaded, unpack the archive onto the root of your newly created FreeDOS bootable USB flash drive
STEP 3 Select a system and install the LSI card
Prior to installing the card in your system you’ll want to grab the SAS address of the card. This can be found on the back side of the card, directly below the PCB cut-away. This address always starts with 500605b:
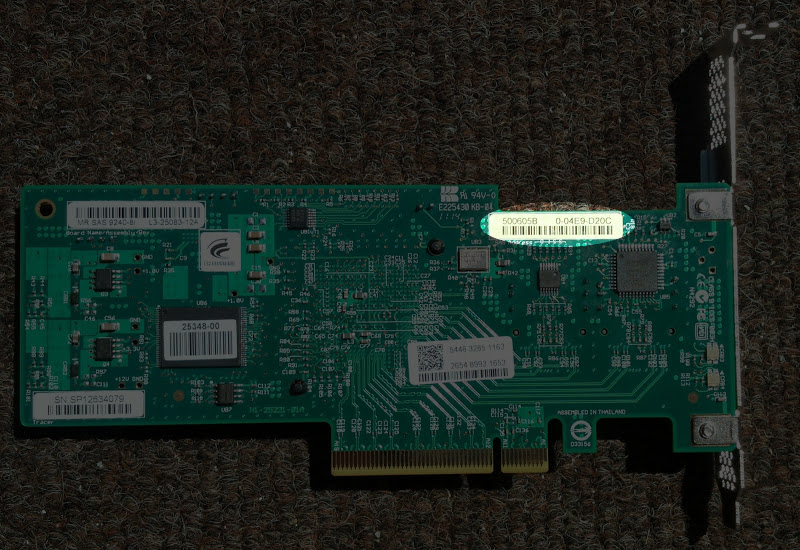
In the above example the complete SAS address will be: 500605b004e9d20c
Be sure to write this down, you’ll need it later!
Next, for this process to work you must utilize a system which supports at least PCI express 4x or better. You will also need to pick a system which doesn’t currently utilize an LSI controller or LSI variant. Unfortunately many Intel based systems won’t work because of problems associated with the sas2flsh utility from LSI. I found this to be true when attempting this procedure on my new LGA 1155 based board. The quick and dirty solution was to pull out my old AM2 based system and use that. For those interested in replicating this system, it was an ASUS M2A-74AM motherboard with some AM2+ chip and ram. Really the motherboard is the most critical part of this process.
Please also note again that this process will only be successful when flashing 1 LSI card at a time!
STEP 4 Boot FreeDOS
Boot up your newly created FreeDOS USB Flash drive, when prompted by the FreeDOS menu, select option (5) FreeDOS Live CD only. I’ve found this to be the most stable as other options tried resulted in instant crashes of FreeDOS with this set of tools.
Also remember, this is DOS, all of your files (which you extracted to the root of USB Flash drive) will be available under the C: drive.
STEP 5 Backup your current Serial Boot ROM
To restore your card to factory defaults, at some point in the future, or the back out of the changes you’re making now, it’s a good idea to create a backup of your Serial Boot ROM (SBR). To do this run the following command:
megarec -readsbr 0 <backup file name>.sbr
Where <backup file name> is replace it with the name you wish to save the SBR file as. (I simply used: backup)
STEP 6 Clear the Serial Boot ROM and erase the controller firmware
To clear the Serial Boot ROM and erase the controller, first write the empty.bin file back to the controllers Serial Boot ROM, then erase the firmware:
Clear the SBR with the following command:
megarec -writesbr 0 empty.bin
Now erase the controller flash memory. (This procedure is safe and recoverable)
megarec -cleanflash 0
Once complete, power cycle your system. A simple warm boot may do the tick however it’s recommended that you completely power down and then back up your system prior to the next steps.
Also note that upon reboot you will no longer see the LSI boot menu and notices, as these have been erased.
STEP 6 Writing the new firmware and re-adding the SAS address
The final step in this process is to write the new firmware back to the controller and then reassign the SAS address which we obtained earlier from the back of the controller card (see above)
Using this command, flash the provided 2108it.bin firmware along with the mtpsas2.rom:
sas2flsh -o -f 2108it.bin -b mptsas2.rom
At this point your controller should flash with the new firmware image, however if you received an error such as “Failed to initialize PAL…” then you’ll need to try this procedure again with a different motherboard.
Assuming your flash was successful, next re-address your controller card with it’s SAS address:
sas2flsh -o -sasadd <address>
In my case, address would be: 500605b004e9d20c
And that’s it! If all went well on your next reboot, your card should come online as a simple HBA pass through!
Restoring the controller back to factory defaults
To restore the controller back to factory defaults obtain the factory firmware from LSI’s website, extract the firmware file imr_fw.rom to your USB flash drive produced in step 1, and follow steps 2, 3, 4, and 6. Once complete write your backup Serial Boot ROM back to the controller:
megarec -writesbr 0 backup.sbr
Or what ever name you’ve chosen for your backup file. Once complete write the factory flash rom image back to the controller:
megarec -m0flash 0 imr_fw.rom
After that finishes, power cycle your system. Please note that upon reboot, your controller will appear to hang, this is nothing to worry about as the hang is the controller itself reconfiguring for the new firmware. This takes anywhere from 3 to 5 minutes so just be patient.